
Imagine starting a new frontend project from “scratch”. And by scratch I do not mean literally from scratch, because that is not something I would recommend doing. I mean, after you have chosen the tech stack and set up the initial project structure, what are the first steps you take after that? How do you format your code? What does your basic setup look like?
I will explain my basic setup, as I am currently in a situation where we are starting a new project. I have used this setup on multiple projects of varying sizes ranging from single-person side projects to 15+ developers larger project.
The only things we have decided for this new project is that we will use Preact instead of React and we will use MobX for state management. And the backend will be a Scala Play application.
Backend
A typical web project consists of a backend and a frontend. I think it is a good solution to have them both in a single git repository under different folders.
For backend, use whatever technology fits you best. In this blog post I am not going to concentrate on the backend part. I am more of a web frontend developer, although I do full stack development.
I assume the purpose of the backend is to provide an API that the frontend part can receive data from. Follow the acknowledged best practices for the technology you are using. Write tests and have a CI run the tests for PRs and before deploying code. When choosing technologies, select the boring and battle-tested technologies.
In our case this means technologies, such as Scala Play Framework and PostgreSQL on the backend.
Frontend
Web frontend, on the other hand is a whole different world. A thing called best practices simply does not exist. Almost everything in the frontend world has multiple opinionated ways of doing it, including multiple ways of shooting your self in the foot. Frontend developers rarely agree on ways of working, coding standards and other issues.
However, here I will explain some of the basic setup and choices I like to do for projects I work on. This is an opinionated list and it is completely fine to disagree with my setup.
Boring is Safe
Frontend scene used to be changing at a rapid pace. New frameworks used to be released every few weeks and people would rewrite their applications in the newest hotness every few months. Fast forward to 2019, where the scene has actually become boring. No (notable) new frameworks have been released in ages (in web years at least).
Boring and established technologies have taken over. Everyone is doing either React, Vue, or Angular. And every framework and library is basically converging towards a similar approach. This is boring.
But, on the other hand it is a good sign. These technologies have become mature. They are by far production ready and battle tested. So, go ahead, use them.
Use React or Preact or whatever other mainstream framework/library you like. They are boring, but they work. And finding people who knows them is fairly simple. The wide ecosystem provides a multitude of open source libraries and tools to make your life easier.
Asking a question in StackOverflow… wait you probably do not even need to ask. Someone has surely encountered the same problem that you are facing. Chances are quite high that there is a workaround or even a fix available.
JavaScript vs. TypeScript vs. Flow
If you have to choose between JavaScript, TypeScript and Flow, always choose TypeScript. It is by far better than JS and more popular and robust than Flow. TypeScript will not force you to write bug-free code, but at least it may detect the most common errors on compile-time. Typings act as a kind of documentation as well making it easier for new joiners to understand the codebase.
However, if you can, stay away from JavaScript and TypeScript all together and use something like Elm that promises “No Runtime Exceptions”, which is true, by the way.
“No Runtime Exceptions”
– Elm Docs
TypeScript and TSLint
Use as strict tslint rules as you dare and you and your team is comfortable with.
Our current tsconfig.json looks like this:
{
  "compilerOptions": {
    "outDir": "./public",
    "target": "es5",
    "module": "commonjs",
    "removeComments": true,
    "sourceMap": true,
    "jsx": "react",
    "jsxFactory": "h",
    "experimentalDecorators": true,
    "resolveJsonModule": true,
    "noImplicitAny": true,
    "noImplicitReturns": true,
    "strictNullChecks": true
  },
  "include": ["./src/**/*.tsx", "./src/**/*.ts"]
}
And our tslint.json looks like this:
{
  "rules": {
    "adjacent-overload-signatures": true,
    "curly": true,
    "eofline": true,
    "align": [true, "parameters"],
    "class-name": true,
    "indent": [true, "spaces"],
    "no-angle-bracket-type-assertion": true,
    "max-line-length": [true, 100],
    "max-file-line-count": [true, 500],
    "no-consecutive-blank-lines": [true, 1],
    "member-access": false,
    "no-trailing-whitespace": true,
    "no-bitwise": true,
    "no-debugger": true,
    "prefer-const": true,
    "no-empty-interface": true,
    "no-string-throw": true,
    "unified-signatures": true,
    "space-before-function-paren": [
      true,
      {
        "anonymous": "never",
        "named": "never",
        "asyncArrow": "always",
        "method": "never",
        "constructor": "never"
      }
    ],
    "prefer-method-signature": false,
    "arrow-return-shorthand": [true, "multiline"],
    "no-duplicate-variable": true,
    "no-inferrable-types": false,
    "no-var-keyword": true,
    "variable-name": [
      true,
      "ban-keywords",
      "check-format",
      "allow-leading-underscore",
      "allow-pascal-case"
    ],
    "no-empty": true,
    "no-shadowed-variable": true,
    "no-unused-expression": true,
    "triple-equals": true,
    "jsdoc-format": true,
    "one-line": [true, "check-else", "check-whitespace", "check-open-brace"],
    "trailing-comma": [false, { "multiline": "never", "singleline": "never" }],
    "quotemark": [false, "single", "avoid-escape"],
    "semicolon": [false, "always", "ignore-interfaces"],
    "typedef-whitespace": [
      true,
      {
        "call-signature": "nospace",
        "index-signature": "nospace",
        "parameter": "nospace",
        "property-declaration": "nospace",
        "variable-declaration": "nospace"
      },
      {
        "call-signature": "onespace",
        "index-signature": "onespace",
        "parameter": "onespace",
        "property-declaration": "onespace",
        "variable-declaration": "onespace"
      }
    ],
    "whitespace": [
      true,
      "check-branch",
      "check-decl",
      "check-operator",
      "check-separator",
      "check-type"
    ],
    "no-console": ["warning", { "allow": ["warn", "error"] }]
  }
}
I am actually unsure about the tslint rules, whether they make sense or not. I have just been copying that around from project to project and making small additions or changes when needed.
Code Formatting
Always use automatic code formatters when available. Do not rely on coding conventions. Someone on your team will either forget to follow them or just ignore them. Automated formatting will make reviewing PRs much easier and save your team a ton of time from unnecessary discussions about code formatting.
For Elm, use elm-format and for almost everything else, use Prettier.
Seriously, just do it.
And if you did not know, Prettier has support for multiple languages, including JS, JSON, TS, CSS, HTML, MD and others.
Prettier is an opinionated and almost zero configuration formatter.
However, I like to configure it just a bit.
My .prettierrc file typically looks like this:
{
  "arrowParens": "always",
  "semi": true,
  "useTabs": false,
  "tabWidth": 2,
  "bracketSpacing": true,
  "singleQuote": true,
  "overrides": [
    {
      "files": "*.{scss,css,html}",
      "options": {
        "singleQuote": false
      }
    }
  ]
}
Set up automatic formatting in your editor of choice.
I use VS Code, where it is fairly easy to enable by enabling the Editor: Format On Save option.
Additionally add format as an NPM script:
"scripts": {
    ...
    "format": "prettier --write 'src/**/*.{ts,js,json,css,md,html}'",
    ...
}
However, not everyone in your team will have prettier formatter enabled in their editor or remember to run the formatter before commiting code.
This is where git pre-commit and pre-push hooks help you.
Setting up shared git hooks has traditionally been a hasle, since they live under the .git/hooks folder and not actually as code in the repository.
Nowadays, there is a nice and easy to use solution for this:
- Install husky and lint-staged:
npm i husky lint-staged --save-dev
- Add the following configurations to your package.json:
"lint-staged": {
        "linters": {
            "*.{ts,js,css,md,html}": [
                "prettier --write",
                "git add"
            ]
        }
},
"husky": {
        "hooks": {
            "pre-commit": "lint-staged"
        }
}
This configuration will run matched files through prettier before they are commited. This means that malformatted code will get formatted using prettier and the changes will be added in the commit automatically. However, some people may find this annoying since it happens automatically and without your control.
In that case a better option is to have a pre-push hook that runs prettier with a flag that makes it return false if something would need formatting. This way your push to the remote will fail and you will have to manually run the formatter and then commit those changes and try again.
"scripts": {
    ...
    "prepush": "prettier --check 'src/**/*.{ts,js,css,md,html}'",
    ...
}
Note: In our projects where we use this, we don’t directly call the check format like this. Instead we call a script that then calls that and outputs some helpful instructions for how to proceed if the push fails.
NPM Packages
Avoid using both yarn.lock and package-lock.json.
We typically ignore both of them in our .gitignore, but this is not a perfect solution, since they will still be created on developers’ devices and may cause problems.
I currently recommend using npm i and commiting package-lock.json.
Better solution is to use npm config set save-exact true or add save-exact=true to a file called .npmrc.
Your .npmrc file could look like this:
save_exact=true
This will then save the exact versions of the packages when installing them also for your team members.
This way you gain more control over packages as they will not be upgraded.
Only upgrade packages when you explicitely want to upgrade them.
But remember to do it regurarly and remember to check the output of npm audit and upgrade packages when needed.
I like to use npm-check-updates for checking for updates and upgrading them.
Additionally, remember npmplease.com it will quite often save your day, unfortunately.
State Management
Use MobX for state handling. It works. It is easy to get started with. We have used it in many projects and have not hit any limitations in those and are fairly comfortable with using it. Just remember to enable the strict mode.
Testing
Use Jest as a test runner. Use Jest snapshot tests, but don’t overuse it. Do not create too large snapshots. Remember, that you can take snapshots of data as well, it does not need to be components.
Use react-testing-ĺibrary for writing test.
Have your CI run the tests and report failures. Make sure your deploy pipeline runs tests and only continues if tests are passing.
CSS
Use CSS Modules in combination with CSS Custom Properties if your browser support allows using them. CSS Modules allows you to isolate style rules on component level by postfixing the class names with a random string. If your components are small, you don’t even need SCSS or LESS. CSS will be enough if you keep the structure simple, so nesting is not needed.
However, some global styling is needed. Have one CSS file for global styles and one file for defining variables as CSS Custom Properties aka CSS Variables.
Git GUI
I highly recommend using a graphical user interface for git, especially when working in a larger team. I personally use GitKraken and enjoy using it, although there are some rough edges still. Sometimes I still need to run some command from the command line. It is nice to see visually what other people in your team have been working on. Rebasing, resetting, merging, and even “undoing” is super easy using GitKraken. GitKraken has some nice colors as well as you can see from the screenshot below.
Terminal
I recommend using tmux or similar solution for easily splitting to multiple smaller tabs and splits inside a terminal instance.
This allows me to have:
- One tab per project with
- One split running the backend
- One split running the frontend dev server
- One split running the frontend tests in watch mode
- Additionally at least one extra split for running random commands etc.
Tmux also works like screen and remains your sessions.
Learning the keyboard shortcuts may take a while though.
I personally am not using the default keybindings.
You can see my tmux.conf here.
Use oh-my-zsh.
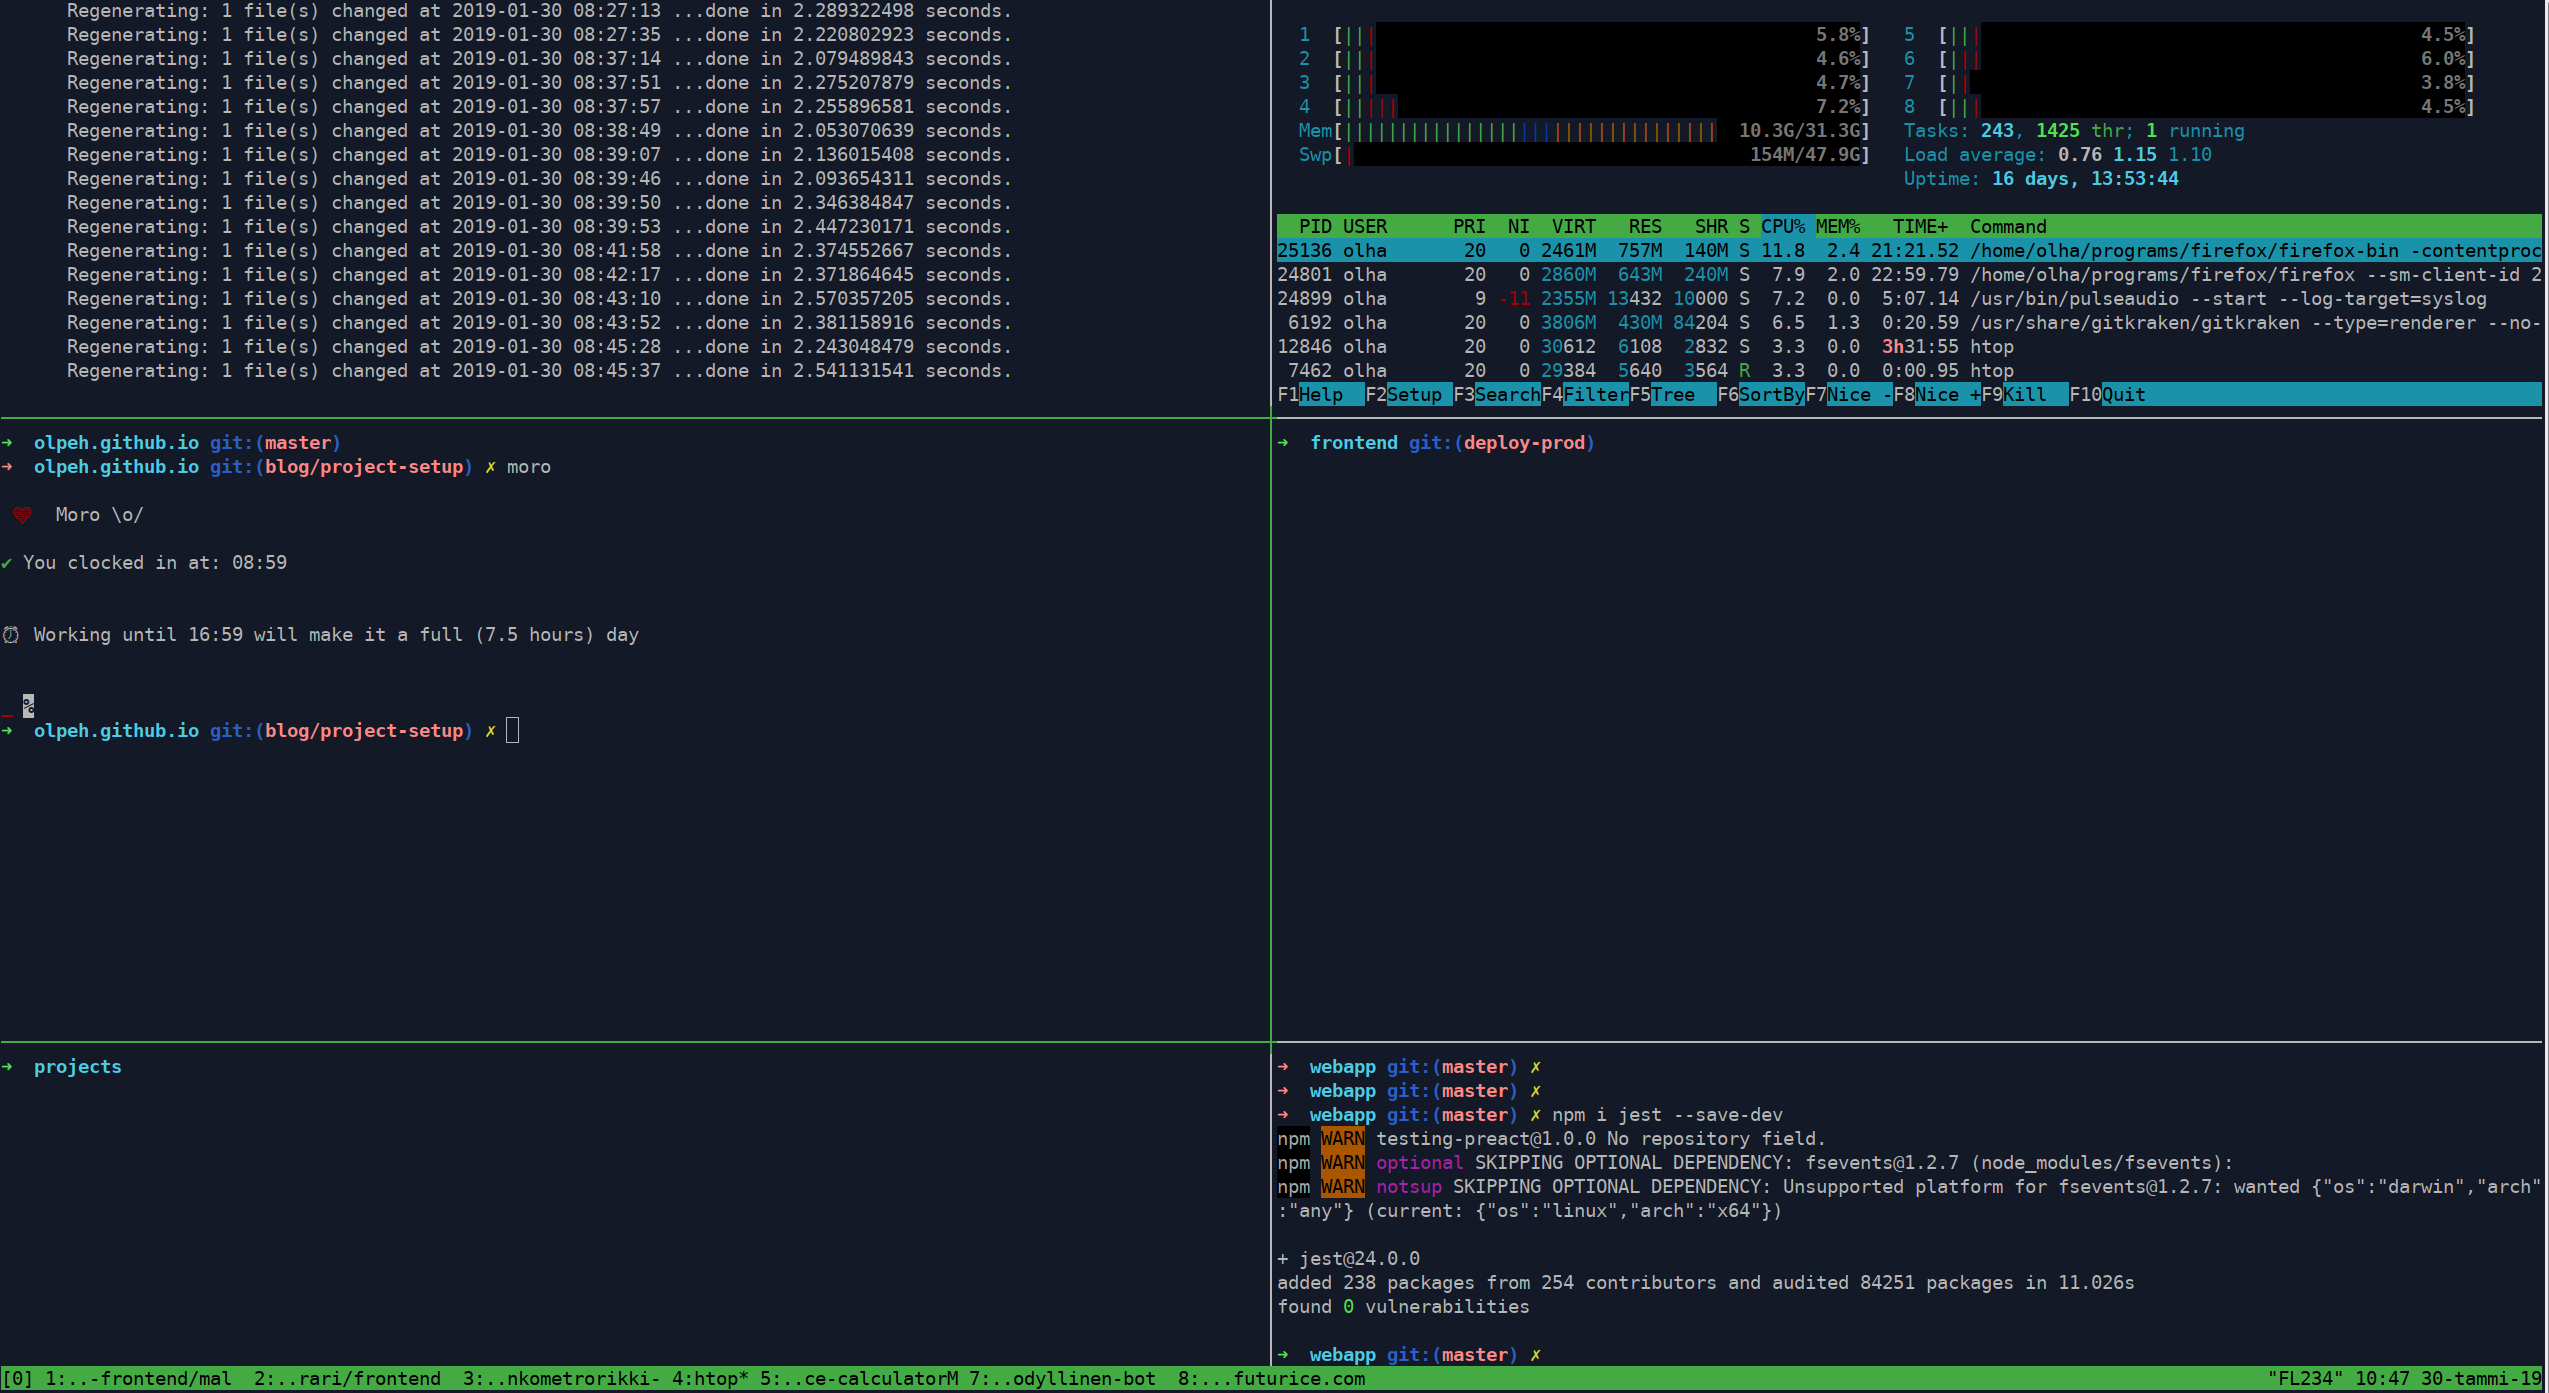 Screenshot of my typical terminal layout.
Final Tips
Use npm-quick-run! It’s the most useful NPM package in the whole NPM. I don’t understand why it does not have more GitHub stars and users.
Use AutoJump because cd is wasting your time.
Use ctrl + r for reverse history search in terminal.
This helps you in finding commands that you have used before.
My colleague Juhis recommends using McFly.
I have not tried it, as I am happy with the default history search.
Use patch-package to fix problems in libraries/modules without having to wait for a patch to be released.